
Issues with Outlook
1. Cannot Start Microsoft Outlook
“Cannot Start Microsoft Outlook” is one of the common errors that Outlook users encounter. The error may occur due to several reasons, including Outlook data file (PST) corruption or damaged Outlook profile.
2. Outlook is Not Responding
Another common Outlook error that many users encounter is “Outlook is not responding.” The error usually occurs when Outlook cannot process a request or action. This may happen due to low memory, storage issues, or processor performance.
To fix this error, you can try freeing up the memory and processing power by closing other applications.
3. Outlook Keeps Asking for Password
Sometimes, when a user opens the Outlook client, they see a prompt on the screen asking for the password. Even after entering the password, it pops up again. This may occur when there is an issue with your Email Account settings or when the password is incorrect/recently changed.
If your Outlook keeps asking for the password, you can try the following:
- Check that the password you entered is correct. If not sure, reset the password and enter it.
- Check your Email Account settings and verify that they are correct.
- Disable add-ins that you have installed recently or from an untrusted third party in Outlook.
- Repair your existing profile or create a new one.
For detailed steps, scroll down to the solutions section.
4. Outlook Data File Cannot Be Accessed
“Outlook data file cannot be accessed” is another common Outlook error message that usually occurs when the data file (PST) associated with the Outlook profile gets oversized, damaged, or corrupt. It may also occur due to issues with the storage media.
5. Outlook Calendar Not Syncing
If you use the Outlook calendar to manage your schedule, you may encounter the error message “Outlook calendar not syncing.” This error usually occurs when there is an issue with the synchronization settings or when there is a conflict with other applications.
6. Outlook Emails Stuck in Outbox
Synchronization issues are common in Outlook that can lead to a plethora of errors, such as the “Outlook emails stuck in Outbox” error message. The error occurs when there is,
- Issue with the email account settings.
- Problem with the network connection.
- Problem with Outlook profile.
- Corruption in Outlook data file.
7. Outlook Attachments Not Opening
If you are not able to open attachments received in the emails in Outlook, you may encounter an error message “Outlook attachments not opening.” The error usually occurs when,
- There is an issue with the attached file type.
- The file format is not supported.
- There is problem with the security software settings.
8. Outlook Search Not Working
This is another common Outlook error that may pop up in the email client when Outlook search is not working or shows results slowly due to,
- Issues with the search index.
- Corrupt or damaged Outlook profile.
- Corrupt Outlook data file (PST).
9. Outlook Rules Not Working
Outlook users use rules to efficiently manage their incoming and outgoing emails. But sometimes the rules do not work. If you try to run the rules manually, you may get the ” Outlook rules not working” error.
This error usually occurs due to,
- An issue with the rule settings.
- Corruption in the Outlook profile.
- Damaged, oversized, or corrupt Outlook data file (PST).
To fix this error, you can follow the below steps to recreate the rules.
- Open Outlook and click Rules > Manage Rules and Alerts.
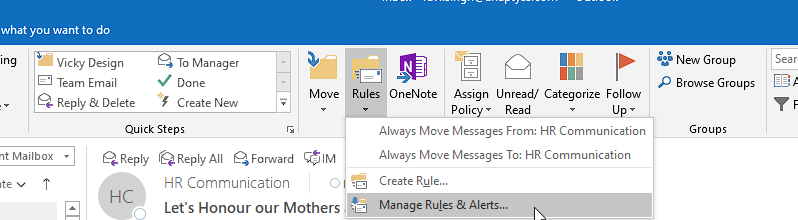
Image of how to fix ‘Outlook rules not working’
- Select the rule that is not working and delete it.
- Create the same rule again.
If this did not fix the error, follow the solutions given below.
10. File Access Denied – Outlook Data File
The error “File access is denied. You do not have permission to access the file C:….abc@xyz.com.pst” error occurs when there is some issues or problems with the Outlook PST file. The error is critical as it prevents you from accessing or opening the emails.
Cleaning up the mailbox
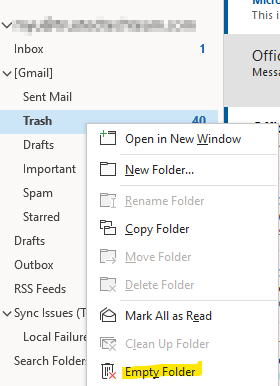
There are a few ways to clean up the mailbox, however the most efficient thing to do first is to manually delete all emails that are unneeded, then empty the trash can. Keep in mind the emails are not actually deleted until it is emptied from the trash as well.
To empty the trash can, simply right click on it and click on “Empty Folder”
After manually sorting through the mail, it is best to run an archive. An archive will take all emails older than a date that you select, and move them into their own file, where it will not count towards the mailbox maximum. You are still able to access these emails, but it will just be a separate file. This will take care of any leftover items that you don’t want to delete but aren’t needed immediately.
Running an archive
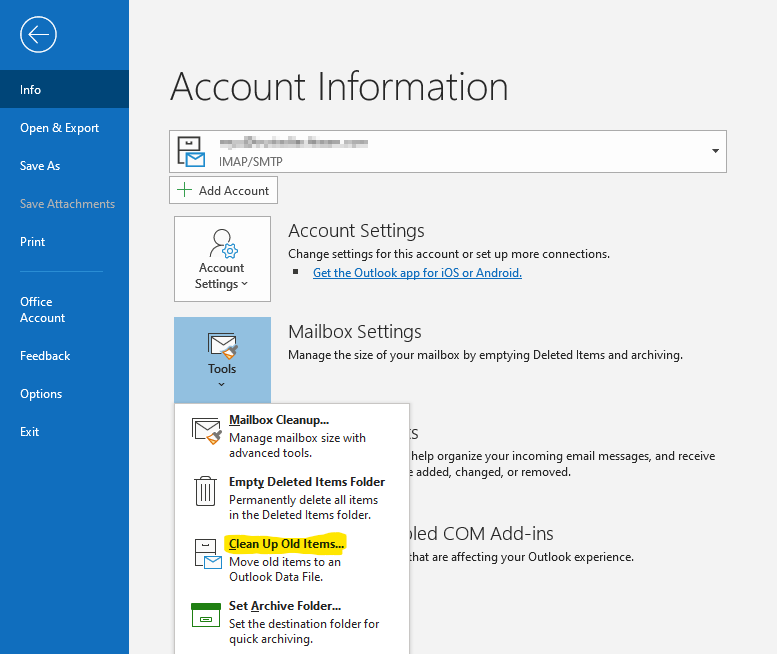
- In Outlook, go to the “File” menu in the top left, then click on “Tools”, then “Clean Up Old Items”.
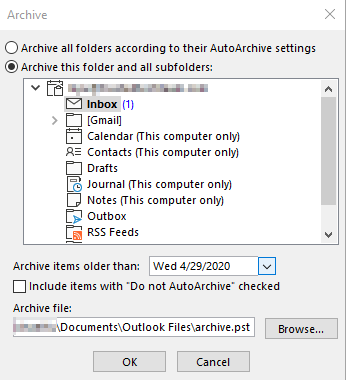
- Clicking this will open the archive menu. Select the items that you want included in this archive task (you can select the very top option if you want everything in this mailbox to be included), then select a date. Every mail item before this date will be archived. You can also select where to drop the output file. By default, it goes to the location of your PST.
Cleaning up the mailbox
There are a few ways to clean up the mailbox, however the most efficient thing to do first is to manually delete all emails that are unneeded, then empty the trash can. Keep in mind the emails are not actually deleted until it is emptied from the trash as well.
To empty the trash can, simply right click on it and click on “Empty Folder”

After manually sorting through the mail, it is best to run an archive. An archive will take all emails older than a date that you select, and move them into their own file, where it will not count towards the mailbox maximum. You are still able to access these emails, but it will just be a separate file. This will take care of any leftover items that you don’t want to delete but aren’t needed immediately.
Running an archive
- In Outlook, go to the “File” menu in the top left, then click on “Tools”, then “Clean Up Old Items”.

- Clicking this will open the archive menu. Select the items that you want included in this archive task (you can select the very top option if you want everything in this mailbox to be included), then select a date. Every mail item before this date will be archived. You can also select where to drop the output file. By default, it goes to the location of your PST.

- Once you have your options selected and hit “OK”, you will see Outlook have an archiving status on the bottom right of the pane. Depending on how many items get archived, this can take a while. Remember not to close Outlook or shut down the computer during this time.

- Once the archive finishes, you will see it appear as a separate mailbox on the left hand side. The archive process should replicate all folder structures so it should look almost identical to your normal mailbox.
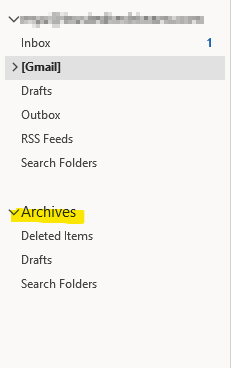
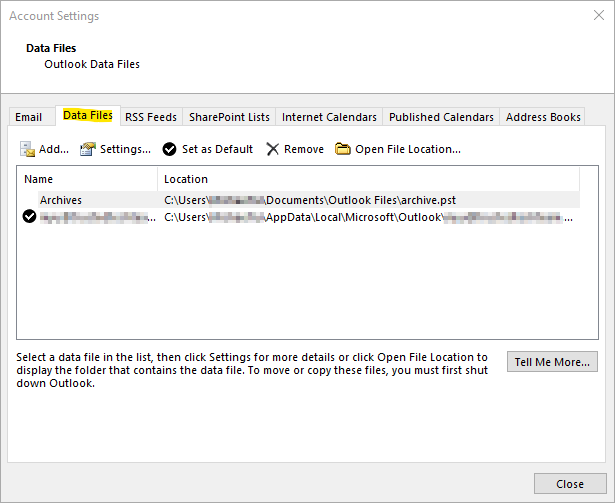
- You can also add other archive files or data files, or check on which files you have added, by going to “File > Account Settings > Account Settings”
After completing this step, you might notice that the mailbox size is not going down. In some configurations, the size won’t change until you rebuild the profile and force it to re-sync.
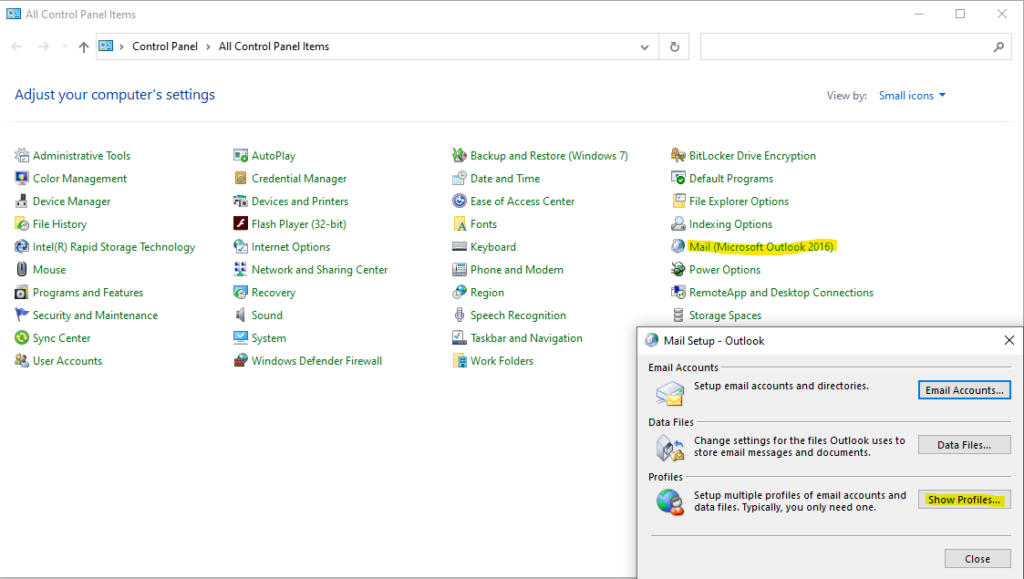
Rebuilding the Outlook Profile
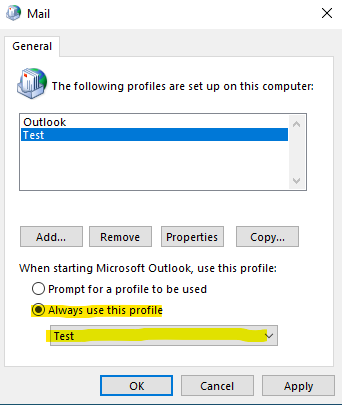
- First, open the Windows Control Panel, then go to the “Mail” item. Once that’s open, click on “Show Profiles”.
- Next, click on “Add” on the page that pops up and give the profile a name.
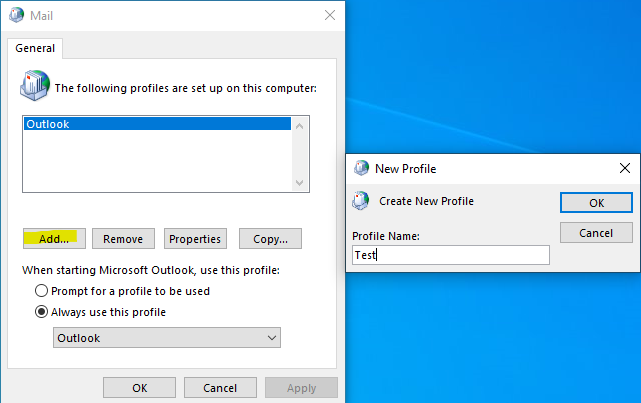
- Enter the user’s information on the next page.
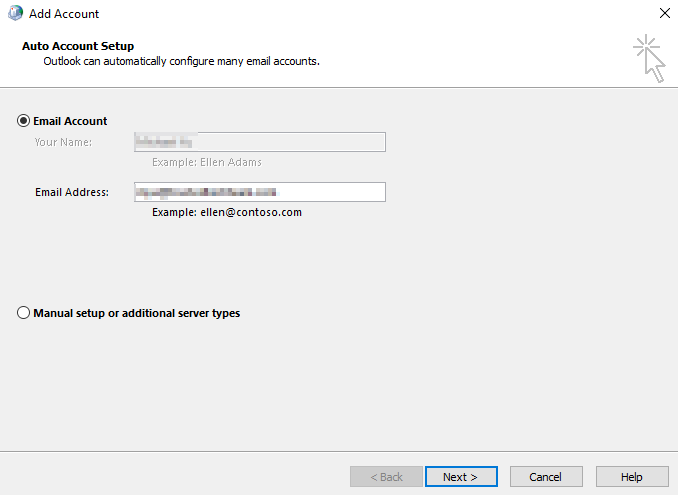
- Once you have the correct information, you should see check marks, and a message letting you know your profile is now created.
- Now back on the mail profiles page, make sure the new profile is selected as the default when opening Outlook, and you’re done!
2. Outlook Crashes or Freezes on Opening
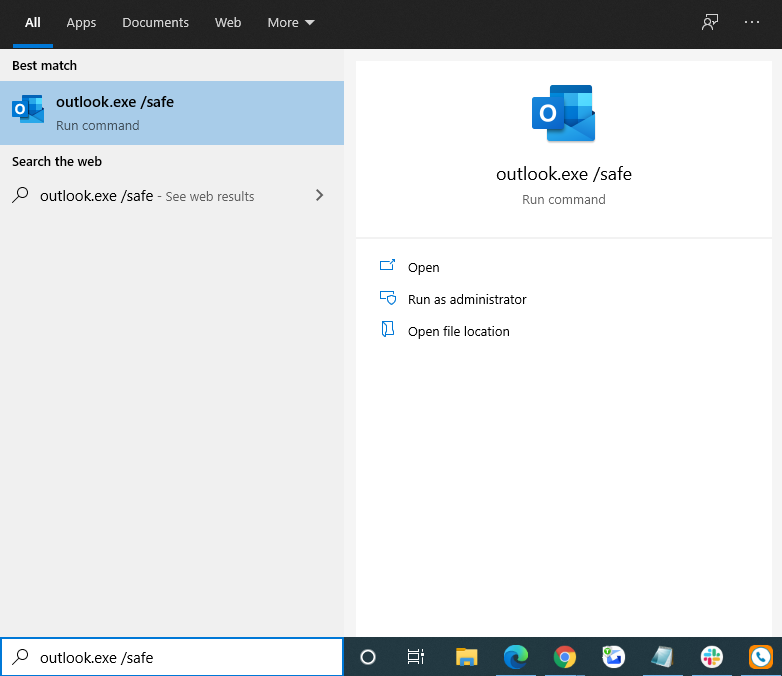
Sometimes you’ll open Outlook and then for no apparent reason, it will freeze or shut itself down. There are quite a few different causes for this, but one of the most common is a defective add-in. Here’s how to disable add-ins in Outlook even when it keeps crashing.
- The first thing you’ll need to do is to open Outlook in safe mode. You can accomplish this by typing “outlook.exe /safe” in the run bar on the bottom left. This will open Outlook in bare-bones mode, with all add-ins disabled. If Outlook runs OK in this mode, there’s a very high chance an add-in in the cause of the issue.
- Next, you’ll want to go to “File > Options” and then the “Add-ins” tab.
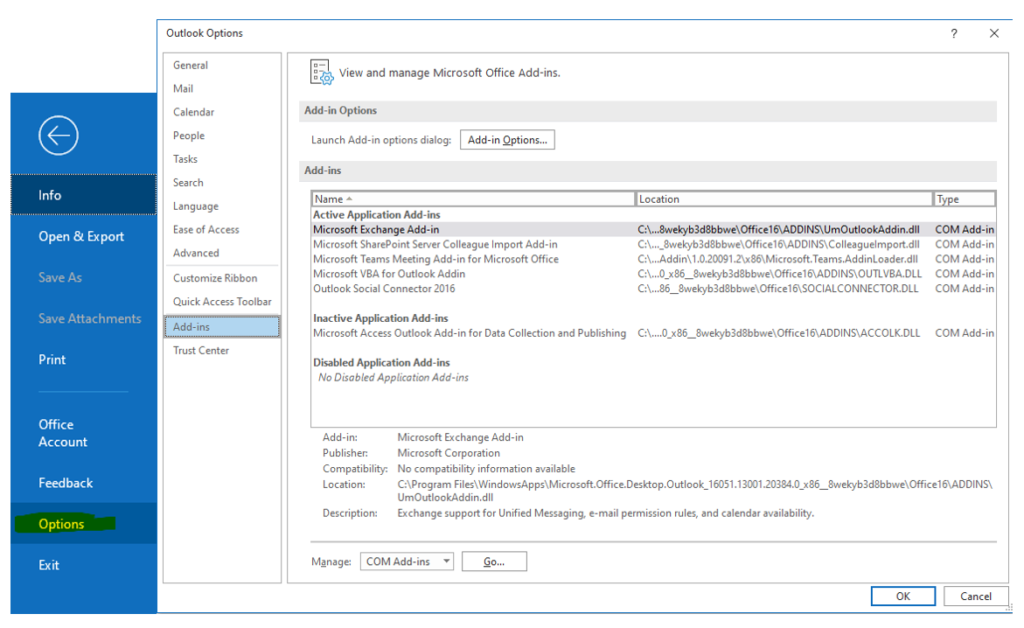
- Click on “Go” at the bottom and you’ll see a list of all the add-ins in your Outlook. It is recommended that you disable all of them, and then enable them 1 by 1 to see which is the one that breaks your Outlook.

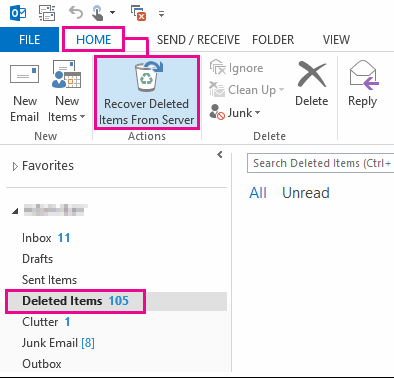
3. Recovering Deleted Items
Sometimes you’ll delete something that you didn’t mean to, and now you’re scrambling to find it. With Outlook, you might be in luck. Even if you delete something, and then empty your deleted items folder, you still have up to 30 days (depending on your organization’s configuration) to get it back. Here’s how:
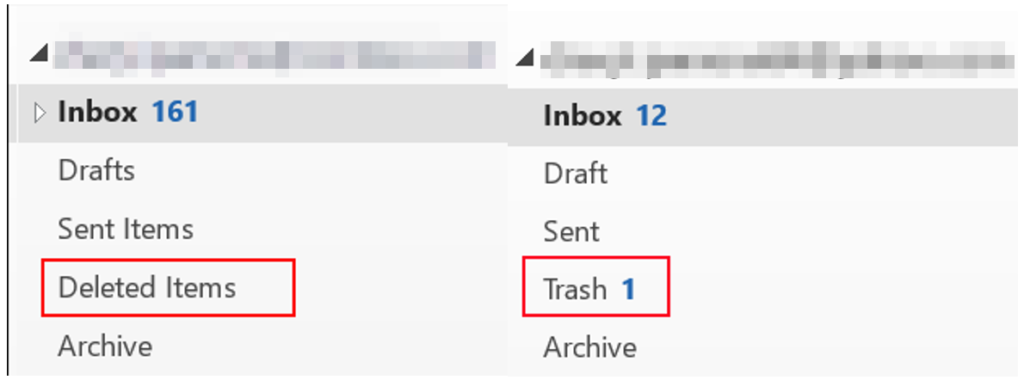
- The first requirement is that you have a mailbox that is recoverable. If you see “Deleted Items”, that means this will apply to you. If you see “Trash”, then you cannot recover an item that is deleted from the Trash folder.
- Click on the “Deleted Items” folder and then click on “Recover Deleted Items From Server” at the top of the pane.
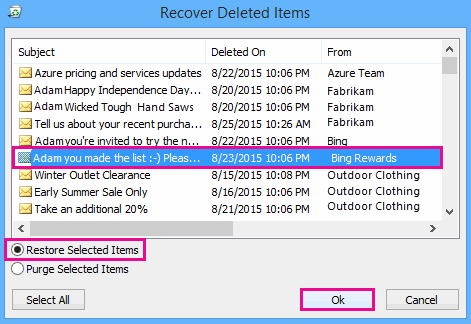
- A new window will pop up that will have a list of items that are able to be recovered. Simply select the items you want to recover (you can use CTRL or SHIFT to select multiple entries) then click “OK”. These items will be moved back into the “Deleted Items” folder, and can then be moved to any other folder in your mailbox.
4. Search Is Not Working
Sometimes when a user tries to search in Outlook, it either returns incomplete results, or returns nothing at all, even if you can see the email normally. Most times, this is caused by a corrupted search index, which you can rebuild. Keep in mind this does take a while, and it’s usually best done after the user has left for the day.
- Open “Indexing Options” from your Start Menu.
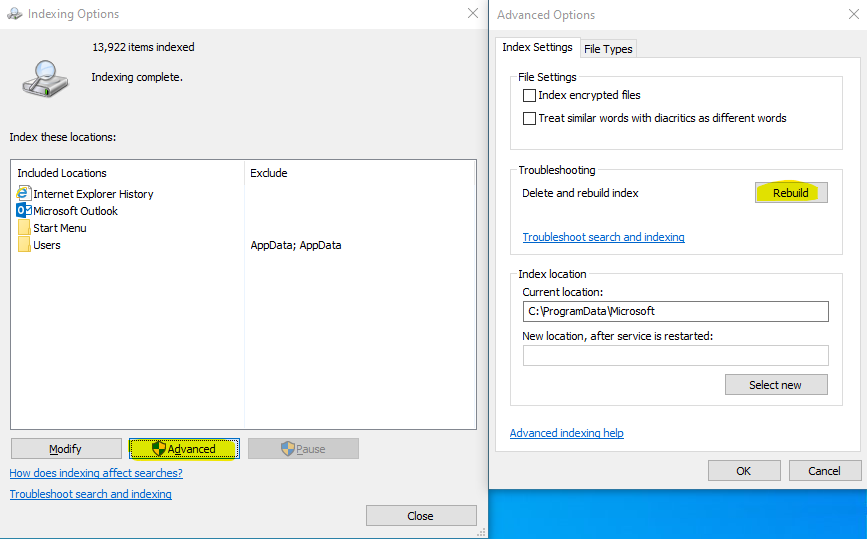
- Click “Advanced” then “Rebuild”.
5. View Settings
A lot of times, a user will click on something by accident and change their view and be unsure of how to get it back. Here are some of the most common.
View > Layout pane – This is the feature that displays what an email will look like before you open the actual email. You can make changes in this area here:
- Folder Pane – Normal/Minimzed/Off
- Reading Pane – Right/Bottom/Off
How to assign delegate access in Outlook
Assign delegate permissions
Delegate can not only edit your calendar, but they can also schedule and respond to meetings on your behalf.
- In new Outlook from the navigation pane, select Calendar.
- From the Home tab, select Share Calendar.
- In the Sharing and permissions page, type the name or email address of the person you want to share your calendar with and assign delegate access. Though you can share your calendar with more than one person, you can only add one person at a time from Outlook on the web.
- After you’ve added the person you want to manage your calendar, select the drop-down list next to their name, and choose the level of access you want them to have.
- Select Delegate to give them the same permission as an editor, plus they will receive meeting requests and responses on your behalf. To allow the delegate to see events on your calendar you marked Private, select the check box for Let delegate view private events.
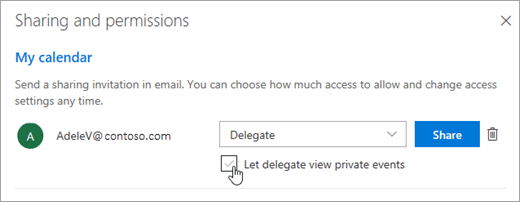 Note: Calendar items marked Private are protected. Most people you share your calendar with see only the time of items marked Private, not the subject, location, or other details. The exception to this is if you select the Let delegate view private events check box.
- Select Delegate to give them the same permission as an editor, plus they will receive meeting requests and responses on your behalf. To allow the delegate to see events on your calendar you marked Private, select the check box for Let delegate view private events.
- After you’ve finished adding the person you want to share your calendar with and have chosen which permission you want to give them, select Share. If you decide not to share your calendar right now, select
 Remove. The person you shared your calendar with will receive an email message telling them about it. When they select the Accept button in the invitation, it will add your calendar to their list of calendars.
 - After you’ve given someone delegate access to your calendar, you’ll see an additional option in Sharing and permissions that lets you control how meeting requests and responses are processed. If you have multiple delegates, you’ll need to do this for each of your delegates.
- Under Delegates, next to Send invitations and responses to, select one of the following options:
- Delegate only Meeting requests and responses go only to your delegates.
- Delegate and send me a copy Meeting requests and responses are sent to you and your delegates. Only your delegates see the option to accept or decline a meeting request, and the notification sent to you will appear like a normal email message. You can still respond to the meeting by opening the calendar item and responding.
- Both my delegate and me Meeting requests and responses are sent both to you and your delegates. Either of you can respond to the meeting invitation.
- If you decide not to share your calendar with someone, under Delegates select Remove for the person you no longer want to act as a delegate

